


Construction
In a Post Frame Shop There Is Nowhere to Hide the Wire
A stud wall swallows a circuit. A post frame wall is girts, a steel skin, and whatever you built in between, and once the liner panel is on, every new circuit is surface conduit.
American Barndos Editorial — September 3, 2026 — 11 min read
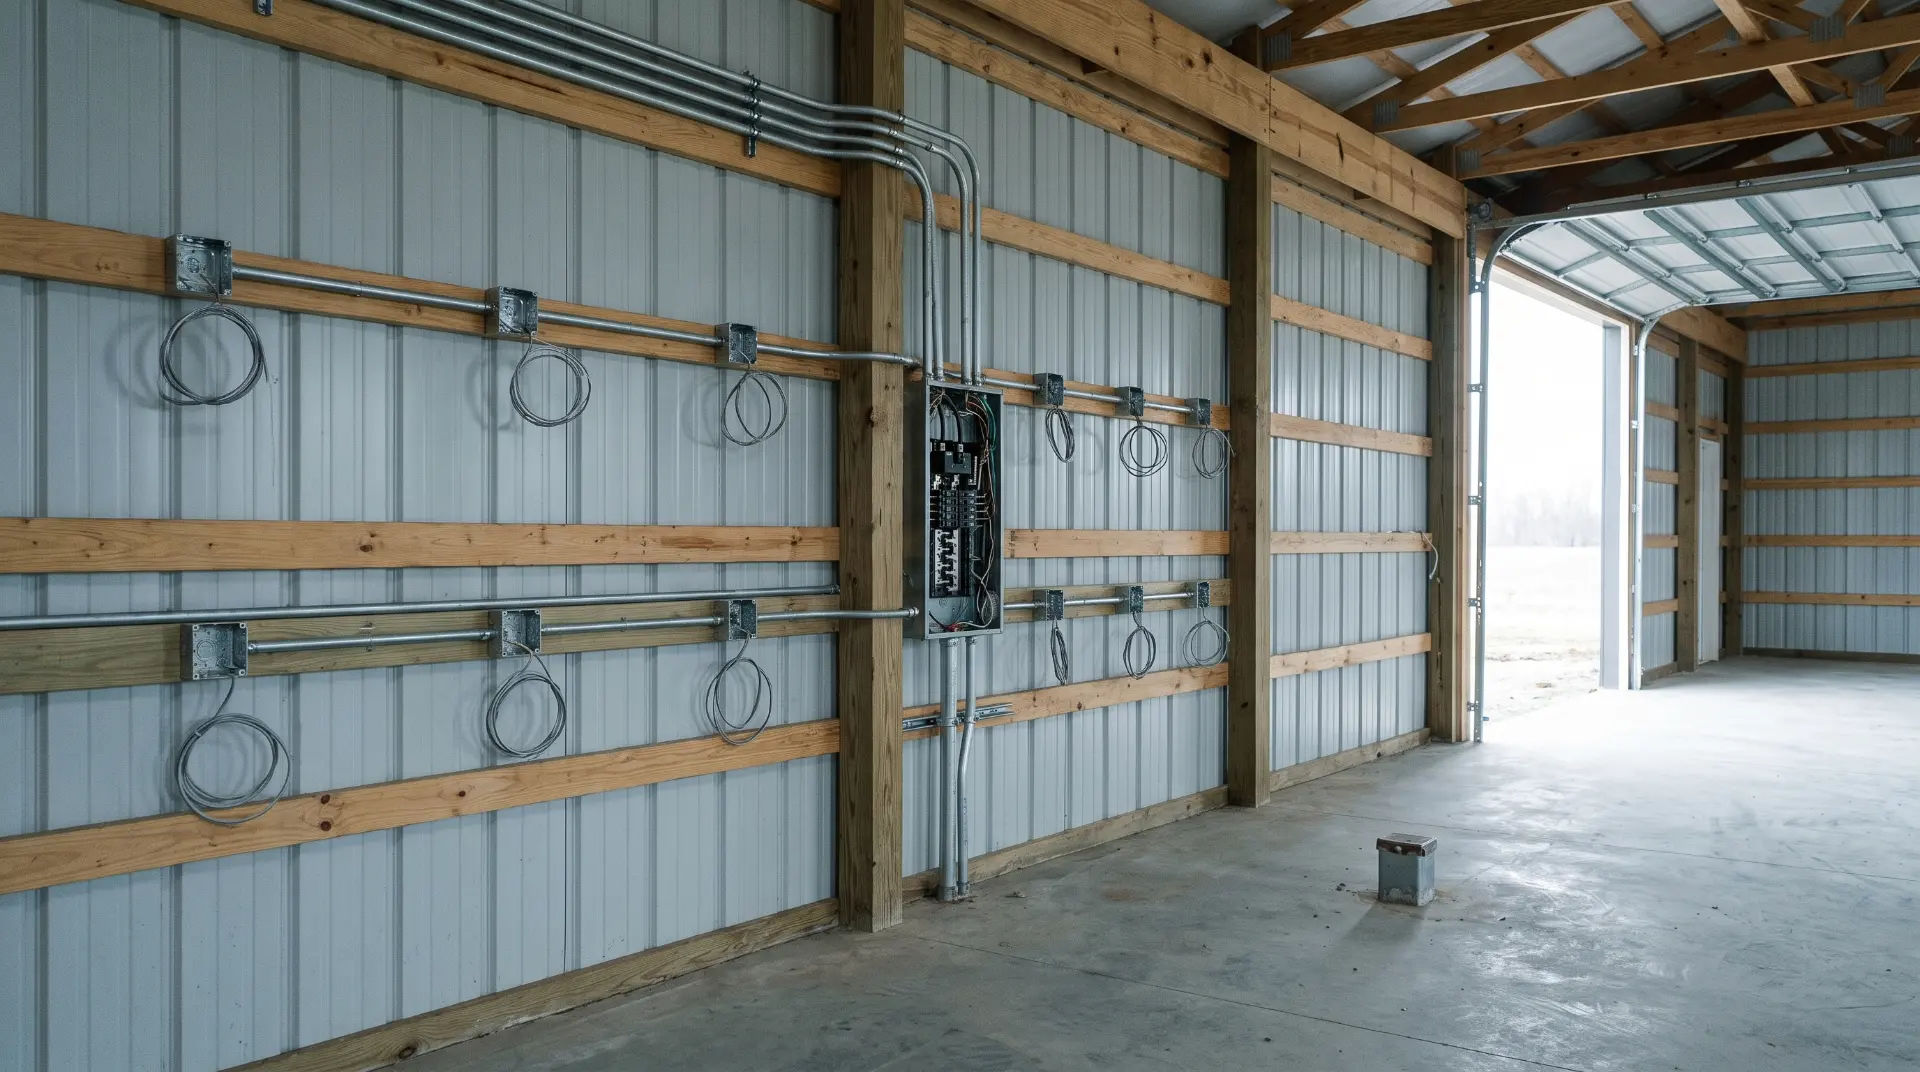
A stud wall swallows a circuit. A post frame wall is girts, a steel skin, and whatever you built in between, and once the liner panel or the spray foam is on, every new circuit is surface conduit you will be looking at for the rest of your life. Service capacity is a one time decision made at the meter. Circuit paths are a one time decision made before the walls close and before the slab is poured. Neither gets cheaper later.
Start here
Three electrical decisions on a barndominium, and they have completely different expiry dates.
| Decision | When it is locked | What it costs to change later |
|---|---|---|
| Service capacity | At the meter, when the service is set | $2,500 to $8,000 and up, plus possible utility work |
| Circuit paths | Before the wall assembly closes and before the slab is poured | Surface conduit, or a saw cut through your floor |
| Devices and fixtures | Any time, if the path exists | Almost nothing |
Most people plan the third one carefully and let the first two happen to them.
This article covers how much power a shop actually needs, why adding breaker slots is not the same as adding power, what your equipment draws, and the specific problem that a post frame wall creates for anyone who wants to add a circuit in year three. It does not cover the utility line extension to your building, which has its own article, or what goes under the slab, which has its own too.
The wall has no cavity, and that changes everything about wiring
In a stud wall you drill a hole, pull a cable, patch the drywall, and nobody knows. That option does not exist here.
A post frame wall is columns at eight or ten feet, a plane of horizontal girts, and steel siding. Behind that you have whatever assembly you built: spray foam against the steel, maybe a liner panel, maybe framing. Wire has exactly three places to go.
- Inside the insulated assembly, which means it has to be roughed in before the foam is sprayed or the liner goes up. Miss it and you are not opening that back up.
- In surface mounted conduit, run on the face of the wall, visible forever.
- In the slab, which means it has to be in before the pour, which the slab article covers.
Here is the part worth being honest about: exposed EMT conduit in a shop is completely normal and looks fine. Every commercial shop in the country is wired that way. It is serviceable, it is adaptable, and running a new circuit in year five is a genuinely easy job.
Exposed conduit down the wall of your great room is not fine.
Which means the boundary between the house side and the shop side is not just a thermal boundary and a mechanical zone, it is also the line where the wiring strategy changes. On the shop side, plan for surface conduit and embrace it. On the house side, everything has to be roughed in before the assembly closes, because there is no second chance that does not look like a mistake.
And the slab decisions are the hardest of all. A floor box for a bench island, a drop for a car lift, a feed to a compressor in the middle of the bay: all of that has to be laid before the concrete. Walk the equipment layout on the dirt with the conduit in your hand, before the pour, or accept that the middle of your shop floor will never have power in it.
Sizing the service, which is the expensive mistake
| Item | Typical 2026 cost |
|---|---|
| Upgrade to 200 amp service | $2,500 to $4,000, with a full range of $2,000 to $5,000 |
| 400 amp service | $4,000 to $8,000 and up |
| Panel only swap | $1,800 to $3,000 |
| Full service upgrade with mast and meter base | $3,000 to $5,000 |
| Converting overhead to underground | adds $4,000 to $8,000 or more |
| Mast or weatherhead replacement | $200 to $1,000 |
| Subpanel installation | $500 to $1,500 |
| Electrician labor | $100 to $250 per hour, typically 50 to 70 percent of the total |
On the utility side, providers typically disconnect and reconnect power for free or for a $100 to $500 coordination fee, and commonly upgrade the service drop wires at no cost. You pay for the meter base and the mast.
And the sentence that matters most for a barndominium: large jumps to 400 amps can occasionally require utility transformer work.
Read that against the utility hookups article, where most providers want a transformer within about 150 feet of the building and where line extension beyond the free allowance is billed per foot. A service size decision made after the transformer is set, on a rural site a quarter mile off the road, is not a panel swap. It is a conversation with the cooperative about equipment.
Decide the service size before the utility sets the transformer. That is the whole recommendation, and it is worth a phone call before you commit.
The part nobody writes about: adding breaker slots is not adding power
This is the single most common misunderstanding in shop electrical, and it costs people the wrong $1,000.
A subpanel costs $500 to $1,500 and gives you more breaker positions. It does not increase your total capacity by one amp. It redistributes what the service already delivers.
So there are two completely different problems that feel identical from the inside of an electrical panel:
- "I am out of breaker spaces." Fix: a subpanel. Cheap, easy, correct.
- "I am out of amps." Fix: a service upgrade, possibly involving the utility. Expensive, slow, and not something a subpanel touches.
People hit the first symptom, buy the subpanel, fill it, and then discover the second problem two winters later when the welder trips the main while the heat pump is running.
The loads that push a shop past 200 amps are the ones you buy after you move in
Nobody plans a service around equipment they do not own yet, which is exactly why the capacity turns out to be short.
The sleeper is EV charging, because of how the code treats it.
Under NEC 210.19(A)(1), a circuit serving a continuous load has to be sized at 125 percent of the load. EV charging qualifies, because the vehicle can pull maximum amperage for three or more hours. NEC Article 625 governs the charging circuits themselves, and NEC 220 governs the load calculation.
| Charger | Breaker | Wire, copper | Continuous draw |
|---|---|---|---|
| 30 A | 40 A | 8 AWG | 30 A |
| 32 A | 40 A | 8 AWG | 32 A |
| 40 A | 50 A | 8 AWG | 40 A |
| 48 A | 60 A | 6 AWG | 48 A |
| 50 A | 60 A | 6 AWG | 50 A |
| 60 A | 80 A | 4 AWG | 60 A |
A 48 amp charger is drawing roughly a quarter of a 200 amp service, continuously, for hours, usually overnight, in a building that is simultaneously running a heat pump. Add a second vehicle and you are at half the service before anyone turns on a welder.
That is not an argument that everyone needs 400 amps. It is an argument that the calculation has to include the things you will plausibly own in ten years, not the things in the truck today.
What your equipment actually draws
Published typical figures for common shop equipment:
| Equipment | Voltage | Typical draw |
|---|---|---|
| Table saw, 3 HP | 240 V | 12 to 15 A |
| Planer, 15 inch | 240 V | 15 to 20 A |
| Jointer, 8 inch | 240 V | 12 to 15 A |
| Dust collector, 1.5 HP | 240 V | 6 A |
| Air compressor, 5 HP | 240 V | 20 to 24 A |
| Table saw, 1.75 HP | 120 V | 13 to 15 A |
| Router, 3 HP | 120 V | 15 A |
| Bandsaw, 14 inch | 120 V | 6 to 8 A |
| Shop vacuum | 120 V | 8 to 12 A |
Published subpanel sizing bands for shops:
| Subpanel | Fits |
|---|---|
| 60 A | Basic hobby shops |
| 100 A | The common answer for most home workshops |
| 125 to 150 A | Larger facilities |
| 200 A | Professional level shops |
Two honest gaps in that table. Welders, car lifts, and plasma cutters vary enormously by model and are not covered in the published figures above. Read the nameplate on the specific machine, and for a welder pay attention to duty cycle as well as input amps, because a machine that draws heavily at 60 percent duty cycle behaves differently on a circuit than its peak number suggests. Bring the actual nameplates to your electrician rather than a category.
Receptacles and lighting, planned rather than defaulted
A shop wants outlets where work happens, which is not where a house code minimum puts them.
Published planning guidance:
- Workbench outlets every 4 to 6 feet at bench height, about 42 inches
- Perimeter walls every 6 to 8 feet at standard height
- 48 inches where you need clear access above something
- LED shop fixtures typically 40 to 50 watts per 4 foot fixture
On code, the source cited notes the 2025 NEC requires GFCI on all garage and unfinished basement receptacles. Confirm which edition your jurisdiction has adopted, because GFCI scope has expanded across recent cycles and the adopted edition is what your inspector uses.
The post frame detail
Your boxes mount to something, and in a post frame wall that something is a girt.
Which means girt spacing partly dictates where an outlet can land. If your receptacle plan wants a box at 42 inches and the nearest girt is at 36, somebody is adding blocking. That is a five minute job during framing and an irritating one afterward.
Give the receptacle plan to whoever is framing, before the girts go up. It is the cheapest coordination on the job and almost nobody does it.
What to ask
Your electrician:
- Run the load calculation including a welder, a compressor, an EV charger, and the HVAC. What service size does it call for?
- Is the shop on its own subpanel, and what is it fed with?
- Where can wire physically run in this wall assembly, and what has to be roughed in before the walls close?
- What is going in the slab, and have you walked the equipment layout before the pour?
- Which NEC edition is adopted here, and what does it require for GFCI in this space?
Your utility:
- What service size is the transformer you are setting sized for, and what happens if I later want 400 amps?
Your builder:
- Can I give you the receptacle plan before the girts go up, so boxes have something to land on?
Question six is the one that has to happen early. Everything else on this list can wait until rough-in. That one has to happen before the utility sets equipment.
Before the walls close
- Decide the service size before the transformer is set, not after.
- Understand the difference between running out of breaker slots and running out of amps, and buy the right fix.
- Include an EV charger in the load calculation even if you do not own an electric vehicle, because it is a continuous load at 125 percent and it is the load most likely to arrive later.
- Bring actual equipment nameplates to the electrician, especially for a welder or a lift.
- Walk the equipment layout on the dirt and mark every floor box before the pour.
- Accept surface conduit on the shop side and plan for it deliberately rather than resenting it later.
- Rough in everything on the house side before the insulation assembly closes, because there is no clean second chance.
- Hand the receptacle plan to the framer so the girts land where the boxes need them.
- Confirm the adopted NEC edition and its GFCI scope with your building department.
A note on scope
This article is general education for people planning a barndominium build. Electrical requirements are governed by the National Electrical Code edition your jurisdiction has adopted and by local amendments, and they change between cycles. Load calculations, circuit sizing, conductor selection, and panel design must be performed by a licensed electrician for your specific building and equipment. Equipment amperage figures are typical published values for representative machines and are superseded by the nameplate on the machine you actually own. Cost figures are typical published ranges as of 2026 and vary substantially by market, service configuration, and utility.
American Barndos sells architectural design documents. We do not design electrical systems, perform load calculations, size services, or specify circuits, and our plan sets are not an electrical design.
Sources
Costs, amperages, code references, and planning figures above are drawn from the following published references, accessed September 2026. All values are typical published figures and are superseded by your adopted code edition, your utility's requirements, and a licensed electrician's calculation for your building.
HomeCostLab, "Electrical Service Upgrade Cost (2026): 200 Amp and Beyond": 200 amp upgrade and full range costs, 400 amp service range and its association with large homes, workshops and multiple EVs, panel only swap versus full service upgrade with mast and meter base, the overhead to underground conversion premium, mast and weatherhead replacement, subpanel installation cost and the note that it does not increase total capacity, electrician labor rates and labor as a share of total, utility disconnect and reconnect and coordination fee practice, service drop wire upgrades at no cost, homeowner responsibility for meter base and mast, and the note that large jumps to 400 amps can occasionally require utility transformer work. https://homecostlab.com/guides/electrical-service-upgrade-cost/
WorkshopCalc, "Workshop Electrical Guide 2026": typical amperage for 240 volt and 120 volt shop equipment including table saws, planer, jointer, dust collector, air compressor, router, bandsaw and shop vacuum, subpanel sizing bands from 60 amp hobby shops through 200 amp professional shops, workbench outlet spacing of every 4 to 6 feet at 42 inch bench height, perimeter spacing of every 6 to 8 feet, 48 inch mounting for access, LED shop fixture wattage, and the 2025 NEC GFCI requirement for garage and unfinished basement receptacles. https://workshopcalc.com/guides/workshop-electrical-guide
ProjectCalc, "EV Charger Wire and Breaker Sizing: NEC 625 plus 210.19": the NEC 210.19(A)(1) requirement to size continuous load circuits at 125 percent of load, the classification of EV charging as a continuous load because the vehicle can pull maximum amperage for three or more hours, the governing sections NEC 210.19, 310.16, 625 and 220, and the breaker, wire gauge and continuous draw table for Level 2 chargers from 30 through 60 amps. https://projectcalc.app/blog/ev-charger-circuit-sizing
Note on equipment coverage: the published equipment table does not include welders, car lifts, or plasma cutters, which vary widely by model. Those figures are deliberately omitted here rather than estimated, and the article directs readers to the nameplate instead.
Founding list
Join the founding list.
The catalog opens to the founding list first, at founding pricing, before it goes public.
Keep reading
- ConstructionIn a Post Frame Building, Bad Compaction Does Not Fail the Building. It Fails the Floor.
- ConstructionIn post frame you pour the floor last, inside a finished building, and everything under it is permanent
- ConstructionYour Steel Skin Is a Vapor Barrier on the Cold Side, Which Is Exactly the Wrong Place for One