


Construction
In post frame you pour the floor last, inside a finished building, and everything under it is permanent
A post frame building is roofed and sided before the floor goes in. That reversal is a gift on weather and a trap on sequence: thickness, vapor retarder, reinforcement, and joint layout all get decided before the truck arrives.
American Barndos Editorial — August 21, 2026 — 12 min read
Start here
The slab is the last major thing that goes wrong on a barndominium and the first thing you notice every day for thirty years.
It is also the component where post frame construction differs most from what your general contractor friend, your brother in law, and most of the internet will tell you, because almost all of that advice assumes a monolithic slab poured before the framing.
Two differences drive everything below.
The slab is not holding the building up. Your columns carry the roof and the walls, and they bear on footings below the frost line. The slab carries the floor and whatever sits on it. That means the design question is not "will the building stand," it is "will the floor stay flat and crack where I told it to."
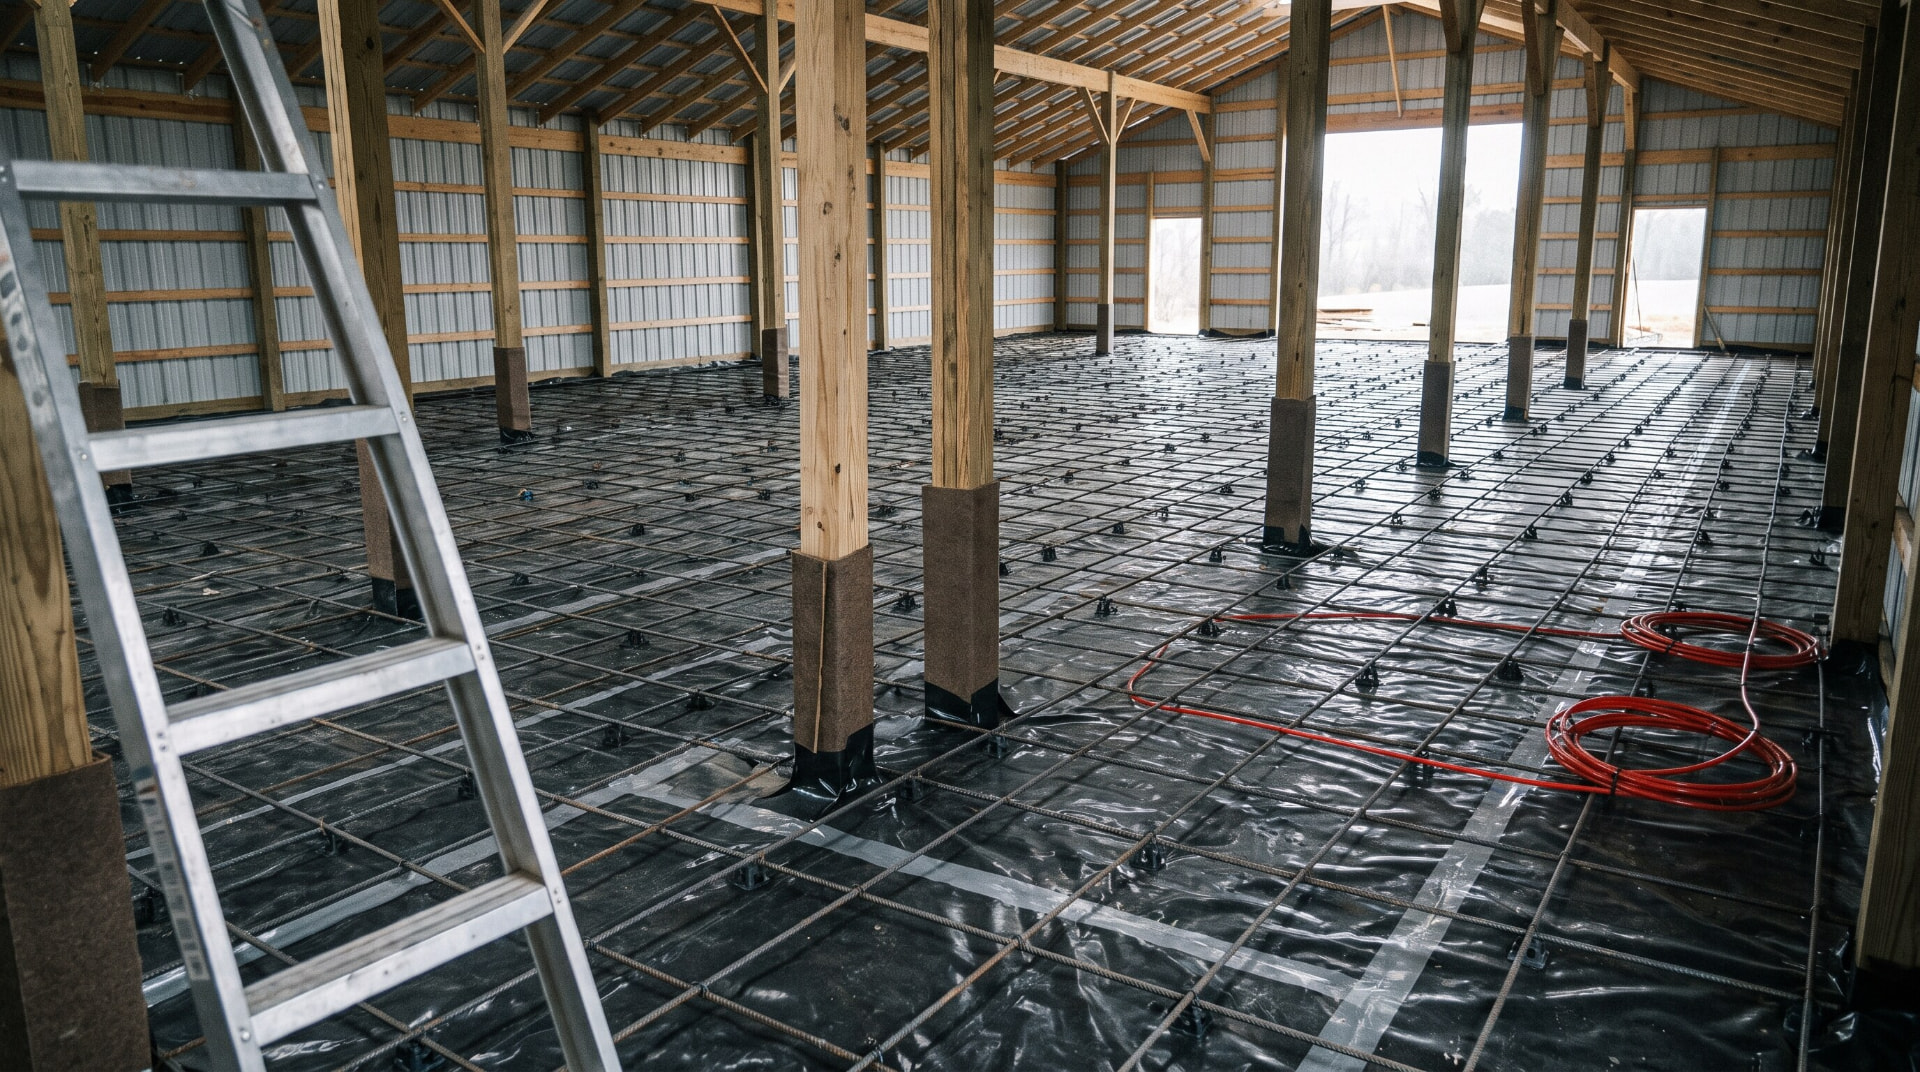
The slab goes in last. Which means a concrete truck cannot back up to it, everything under it has to be installed inside a building with walls already on, and the columns you are pouring around are already standing there, immovable.
This article covers thickness, strength, what goes under the slab, reinforcement, and the joint layout that decides where your floor cracks. It does not cover the pad and compaction underneath it, which has its own article, and it does not cover the site prep sequence.
Thickness and strength
Slab thickness is set by what will sit on it, not by the size of the building.
| Application | Common thickness |
|---|---|
| Patios, walkways, light use storage | 4 inches |
| Garage floors and driveways | 5 inches |
| Heavy loads, equipment pads, metal buildings | 6 inches or more |
For strength, 3,000 psi is the standard residential mix. That is fine under a living area. It is on the light side under the part of the building where you park a tractor, run a lift, or drop a pallet, and heavier use is where mix design and thickness both want a conversation with whoever is engineering your building.
The practical point for a barndominium is that you are usually pouring two buildings' worth of floor in one pour. The living side is a house floor. The shop side is an equipment floor. Speccing the whole thing at 4 inches to save money means the shop half is under-built. Speccing the whole thing at 6 inches means you paid for a shop floor under the bedrooms.
Thickness costs real money, and it is not linear in the way people assume. Going from 4 inches to 5 is 25 percent more concrete across the entire footprint. On a 60 by 80 building that is roughly 15 additional cubic yards for one inch.
Decide the thickness zone by zone with the person engineering the building, and get the transition detailed rather than guessed at in the field.
What goes under it
Base course
A compacted granular base sits between the pad and the slab. Published costs run about $0.75 per square foot for a 4 inch gravel base and about $1.10 for 6 inches, with engineered fill on poor soil reaching $2.50.
The fill and compaction below that base is a separate subject with its own article, and it matters more than anything in this one.
Vapor retarder, and the code changed
This is the item most often value engineered out by someone who learned the rule twenty years ago, and the rule moved.
Under IRC R506.2.3, a vapor retarder placed between the slab and the base course or subgrade must have a minimum thickness of 10 mil and must conform to ASTM E1745 Class A. Joint overlaps must be at least 6 inches. The older 6 mil polyethylene habit does not meet the current requirement. Exceptions exist for unheated structures, small storage rooms, exterior flatwork, and certain local site conditions.
Why care beyond compliance: a slab on grade without an adequate vapor retarder moves water vapor up through the concrete for the life of the building. That shows up as flooring adhesive failure, cupped or delaminating finish floor, and persistent humidity in a building you sealed and insulated carefully. It is a cheap item at pour time and an unfixable one afterward, because the barrier is under the slab.
Specify 10 mil ASTM E1745 Class A minimum, in writing, and confirm the overlaps and the penetration seals before the pour.
Reinforcement
Sources disagree on price here, so both are reported rather than averaged.
| Reinforcement | Published range A | Published range B |
|---|---|---|
| Wire mesh | about $0.35 per sq ft in place | $0.30 to $0.80 per sq ft |
| Fiber mesh | not listed | $0.40 to $0.60 per sq ft |
| #3 rebar | about $0.75 per sq ft | $0.50 to $1.50 per sq ft at 18 inch spacing |
| #4 rebar on grid | about $1.10 per sq ft | not listed |
| Mesh plus bar | about $1.50 per sq ft | not listed |
| Post tension cables | not listed | $1.50 to $3.00 per sq ft |
Reinforcement in a slab on grade is not there to hold the slab up. It is there to hold the crack together after it forms. Concrete on grade will crack; reinforcement, joints, and thickness decide whether that crack is a hairline you never think about or a stepped, spalling line across the middle of your great room.
Post tension is the specific answer to expansive clay and is standard practice in parts of Texas and Oklahoma for that reason. If you are in one of those regions, that row is not an upgrade, it is the baseline, and the soils article covers why.
Joints: where your floor cracks is a decision, not an accident
This is the section worth reading twice, because a barndominium floor is one of the largest uninterrupted slabs in residential construction and joint layout is what keeps it from behaving like one.
Control joints
Control joints are deliberate weak lines that tell the slab where to crack. The spacing rule, from ACI guidance, is expressed as a multiple of slab thickness:
Spacing in feet = n × slab thickness in inches ÷ 12, where n is 24 to 36
| Slab thickness | Maximum spacing at the widest end of the band |
|---|---|
| 4 inches | 12 feet |
| 5 inches | 15 feet |
| 6 inches | 18 feet |
Those are the n equals 36 numbers, achievable under good conditions. Tighter spacing is the conservative call.
Panels should be as square as practical. Length to width should not exceed 1 to 1.5, with 1 to 1.25 as the ideal. A long skinny panel cracks across its middle regardless of how well it was cut, which is why a joint plan is a layout problem and not a matter of running lines wherever the saw operator started.
Saw cut timing is a window, not a day. Conventional sawing runs 6 to 12 hours after finishing. Early entry saws run 1 to 4 hours in warm weather. The window narrows in heat and stretches in cold. Cut too early and you ravel the edge. Cut too late and the slab has already cracked where it wanted to, and your joints are now decoration.
Cut depth is a minimum of one quarter of the slab thickness, with 1 inch as the practical floor on a 4 inch slab. One third depth is the safer call.
Re-entrant corners are the classic failure. Any inside corner concentrates stress and blows out at roughly 45 degrees, so corner saw lines should meet at 45 degrees to isolate them. In a barndominium those corners are everywhere the floor plan steps, at every door pocket in the shop wall, and around any equipment base.
Isolation joints, which post frame makes non-negotiable
Control joints let the slab crack where you chose. Isolation joints let the slab move independently of things that are not moving.
The requirement is full depth separation material, typically half inch asphalt impregnated fiberboard, at all structural columns, posts, walls, and equipment bases where the slab meets a fixed element.
Now apply that to post frame. Your columns are set in concrete below the frost line and they do not move. Your slab is a floating plate on a base course, and it expands, contracts, and settles slightly. Pour those two together rigidly and the slab cracks radially from every column, because the column wins.
A 60 by 80 building at 8 foot column spacing has 22 columns, which is 22 isolation details, each one made in the field by whoever is placing the material that day, inside a finished building, after the pad work was signed off by a different contractor.
Ask specifically how the isolation joint at each column is being detailed and who is responsible for it. It is the single most common place a post frame slab is compromised, and it costs almost nothing to get right.
The part nobody writes about: pouring last changes everything about the sequence
Stick built pours the slab, then frames. Post frame frames, roofs, sides, and then pours. Four consequences follow, and none of them appear in generic slab advice.
One: the truck cannot reach the floor. The building is already up. Concrete gets pumped or wheeled in through door openings. Pump truck cost starts around $450 as a minimum and climbs with volume. Budget it as a line item rather than discovering it on pour day, and make sure your door openings and approach can actually accommodate the equipment. This is a question to settle before the siding goes on, not after.
Two: everything under the floor gets installed inside a finished building. Plumbing rough-in, floor drains, electrical conduit, radon piping if required, and radiant tubing if you are running in floor heat all happen in the dirt, under a roof, in a shell with limited access. It is more comfortable than doing it in the rain and dramatically more awkward than doing it in the open.
Three: after the pour, none of it can change. A forgotten drain, a conduit stub in the wrong place, a bathroom rough-in that shifted two feet in the final plan revision, all of it becomes a saw cut through a finished floor. This is the real reason to hold the pour until the interior layout is genuinely final rather than nearly final.
Four: the weather advantage is real, and it is why the sequence exists. Pouring inside a dry, wind sheltered building removes the two biggest concrete quality variables on a rural site. That is a genuine benefit of post frame and worth understanding as the reason for the trade, not just the consequence of it.
Before the truck arrives
Walk the building with this list. Everything on it is permanent afterward.
- Interior layout final, including any wall the plumbing serves.
- Plumbing rough-in placed, inspected, and pressure tested.
- Floor drains set at the right elevation with slope confirmed.
- Electrical conduit stubbed where floor outlets, islands, and shop equipment will land.
- Radiant tubing laid, secured, and pressurized so a puncture shows up before the pour and not after.
- Vapor retarder placed, lapped 6 inches, and sealed at every penetration.
- Reinforcement supported at the correct height rather than laid on the ground and hooked up during the pour.
- Isolation material in place at every column, post, wall, and equipment base.
- Joint layout drawn and agreed, with panel sizes and aspect ratios checked, not left to pour day.
- Pump access confirmed through an actual door opening.
- Saw cut timing planned against the forecast, with someone accountable for the window.
Running the numbers on a real floor
A 60 by 80 building is 4,800 square feet of floor.
Installed cost, at published ranges of $6 to $12 per square foot and a plain broom finish at $5 to $8, puts the whole floor somewhere between roughly $29,000 and $58,000, with decorative finishes above that.
Concrete volume, which is the part that moves with thickness:
| Thickness | Cubic yards | Material at $145 to $185 per cubic yard |
|---|---|---|
| 4 inches | 59 | $8,600 to $11,000 |
| 5 inches | 74 | $10,700 to $13,700 |
| 6 inches | 89 | $12,900 to $16,500 |
One source publishes ready mix at $145 to $185 per cubic yard with $160 a fair midpoint, another at $120 to $150 for 3,000 psi delivered. Both are reported because delivery distance and mix design move this number more than any national average survives.
Everything else, at 4,800 square feet:
| Item | Cost |
|---|---|
| 4 inch gravel base at $0.75 per sq ft | $3,600 |
| 6 inch base at $1.10 | $5,280 |
| Wire mesh at $0.30 to $0.80 | $1,440 to $3,840 |
| Fiber mesh at $0.40 to $0.60 | $1,920 to $2,880 |
| #3 rebar at $0.50 to $1.50 | $2,400 to $7,200 |
| Thickened edge, 280 linear feet of perimeter at $2 to $4 | $560 to $1,120 |
| Pump truck | from about $450 |
And the joint count, which is where thickness quietly pays you back:
At 4 inches, maximum 12 foot spacing gives 5 panels across the 60 foot width and 7 along the 80 foot length. 35 panels, each about 12 by 11.4 feet, a healthy 1.05 aspect ratio.
At 6 inches, maximum 18 foot spacing gives 4 across at 15 feet and 5 along at 16 feet. 20 panels, 1.07 aspect ratio.
Fifteen fewer joints. Every joint is a line that collects dirt, can spall at the edges, and has to be maintained or filled. The thicker slab costs about $4,700 more in concrete on this building and gives you a floor with 40 percent fewer places to fail, before you count what it does for equipment loads. That is the actual trade, and it is worth making deliberately rather than defaulting to 4 inches because that is what residential means.
What to ask
Your concrete contractor:
- What thickness and what mix strength are you pricing, and does that change between the living side and the shop side?
- Show me the joint layout before the pour. What spacing, what panel sizes, what aspect ratios?
- What vapor retarder are you installing, what thickness, and does it meet ASTM E1745 Class A?
- How are you detailing the isolation joint at each column?
- Is the pump in your number or mine, and have you confirmed access through the door openings?
- Who is cutting the joints, and what is the plan if the window lands at 2 a.m.?
Your building supplier or engineer:
- What thickness and strength do you require under the column line and at any equipment location?
- Does the slab need a thickened edge or turndown anywhere, and where?
Question two is the one that separates contractors. Anyone who has a joint plan drawn before the pour has done this before. Anyone who says they will figure it out with the saw is telling you where your cracks will be.
A note on scope
This article is general education for people planning a post frame or barndominium build. Slab thickness, mix strength, reinforcement, vapor retarder requirements, and joint detailing are governed by your adopted building code, your local amendments, your geotechnical report, and the engineering for your specific building. The IRC vapor retarder figures cited are from the 2021 edition as published; confirm the edition your jurisdiction has adopted. Joint spacing guidance is from published ACI-based practice and is subject to your engineer's direction and site conditions. Cost figures are typical published ranges as of 2026 and vary substantially by market, haul distance, and mix design.
American Barndos sells architectural design documents. We do not design slabs, provide engineering or an engineer's seal, specify concrete mixes, or supervise placement, and our plan sets are not a foundation design.
Ready to look at plans?
Floor area is the single largest driver of slab cost, and shop area is where thickness and strength have to step up. Knowing that before you shop means weighing shop square footage against what it costs to pour a floor that will actually take the loads you are buying it for. Browse plans by footprint, clear span, and shop configuration, and download a free watermarked preview to run the numbers against your own site.
Related reading: In a post frame building, bad compaction does not fail the building, it fails the floor. Soil bearing capacity and what it costs to guess. Barndominium site prep and slab, in order.
Sources
Specifications, requirements, and cost figures above are drawn from the following published references, accessed September 2026. All figures are typical published values and are superseded by your adopted code, your engineer's direction, and quotes from your own market.
CostFlowAI, "Concrete Slab Cost 2026: What Actually Drives the Price": installed cost per square foot, plain broom finish and decorative ranges, ready mix cost per cubic yard and coverage per yard at 4 inches, wire mesh, #3 rebar, #4 rebar on grid and mesh plus bar pricing, 4 inch and 6 inch gravel base and engineered fill costs, pump truck minimum, demolition cost, and the note that 4 inches to 5 inches is 25 percent more concrete. https://costflowai.com/blog/concrete-slab-cost-2026/
Concrete Pour Checker, "Concrete Joint Spacing Per ACI 360R-10": the 24 to 36 times thickness spacing rule and its formula, maximum spacing for 4, 5 and 6 inch slabs, the 1 to 1.5 maximum and 1 to 1.25 ideal panel aspect ratio, saw cut timing windows for conventional and early entry saws, saw cut depth as a fraction of thickness, full depth isolation joint material at columns, posts, walls and equipment bases, and re-entrant corner treatment at 45 degrees. https://concretepourchecker.com/guides/concrete-joint-spacing-aci-360
Stego Industries, "Your Guide to Navigating the IRC Building Code Changes to Vapor Retarders": IRC R506.2.3 requirements including the 10 mil minimum thickness, ASTM E1745 Class A conformance, the 6 inch minimum joint overlap, placement between slab and base course or subgrade, the change from the older 6 mil practice, and the listed exceptions. https://www.stegoindustries.com/blog/your-guide-to-navigating-the-irc-building-code-changes
Metal America Concrete, "Concrete Slab Cost and What to Know in 2026": recommended thickness by application for light use, garage and driveway, and heavy commercial or metal building loads, 3,000 psi delivered cost per cubic yard, rebar, wire mesh, fiber mesh and post tension cable pricing per square foot, and thickened edge cost per linear foot of perimeter. https://metalamericaconcrete.com/blog/concrete-slab-cost-and-what-to-know-in-2026/
Note on conflicting concrete pricing: source one publishes ready mix at $145 to $185 per cubic yard, source four at $120 to $150 for 3,000 psi delivered. Both are reported above rather than averaged, because haul distance, mix design, and local plant competition move this figure more than any national range accounts for.
Note on the worked example: the 4,800 square foot floor area, the cubic yard volumes, the reinforcement and base subtotals, the 280 foot perimeter, and the panel counts at 4 and 6 inches are calculated here from the published unit costs and spacing rules in the sources above, applied to a 60 by 80 building. They illustrate the relationships and are not an estimate for any specific project.
Founding list
Join the founding list.
The catalog opens to the founding list first, at founding pricing, before it goes public.